Principles of 3D Computer Animation: Three Sides Project(with Sam)
Final Outcome: Egg
Ideas generation:
I make some mind maps for the ideas generation and each of them is based on a keyword.
BirthAn old objectCamouflage
Mood boards:
https://miro.com/app/board/uXjVPQv19TE=/
After choosing the egg narrative as the one I want to develop further, I research some 3D artworks and references to get inspiration. I find Lisa Jørgensen’s interior design works on Artstation and I like the cozy and rosy ambiance in her scenarios. Also, I find some 3D models as references in sketch fab to think about the characters and models that I will make in my animation. The kicking and walking parts are important so I find some chicken-hatching videos and baby image references.
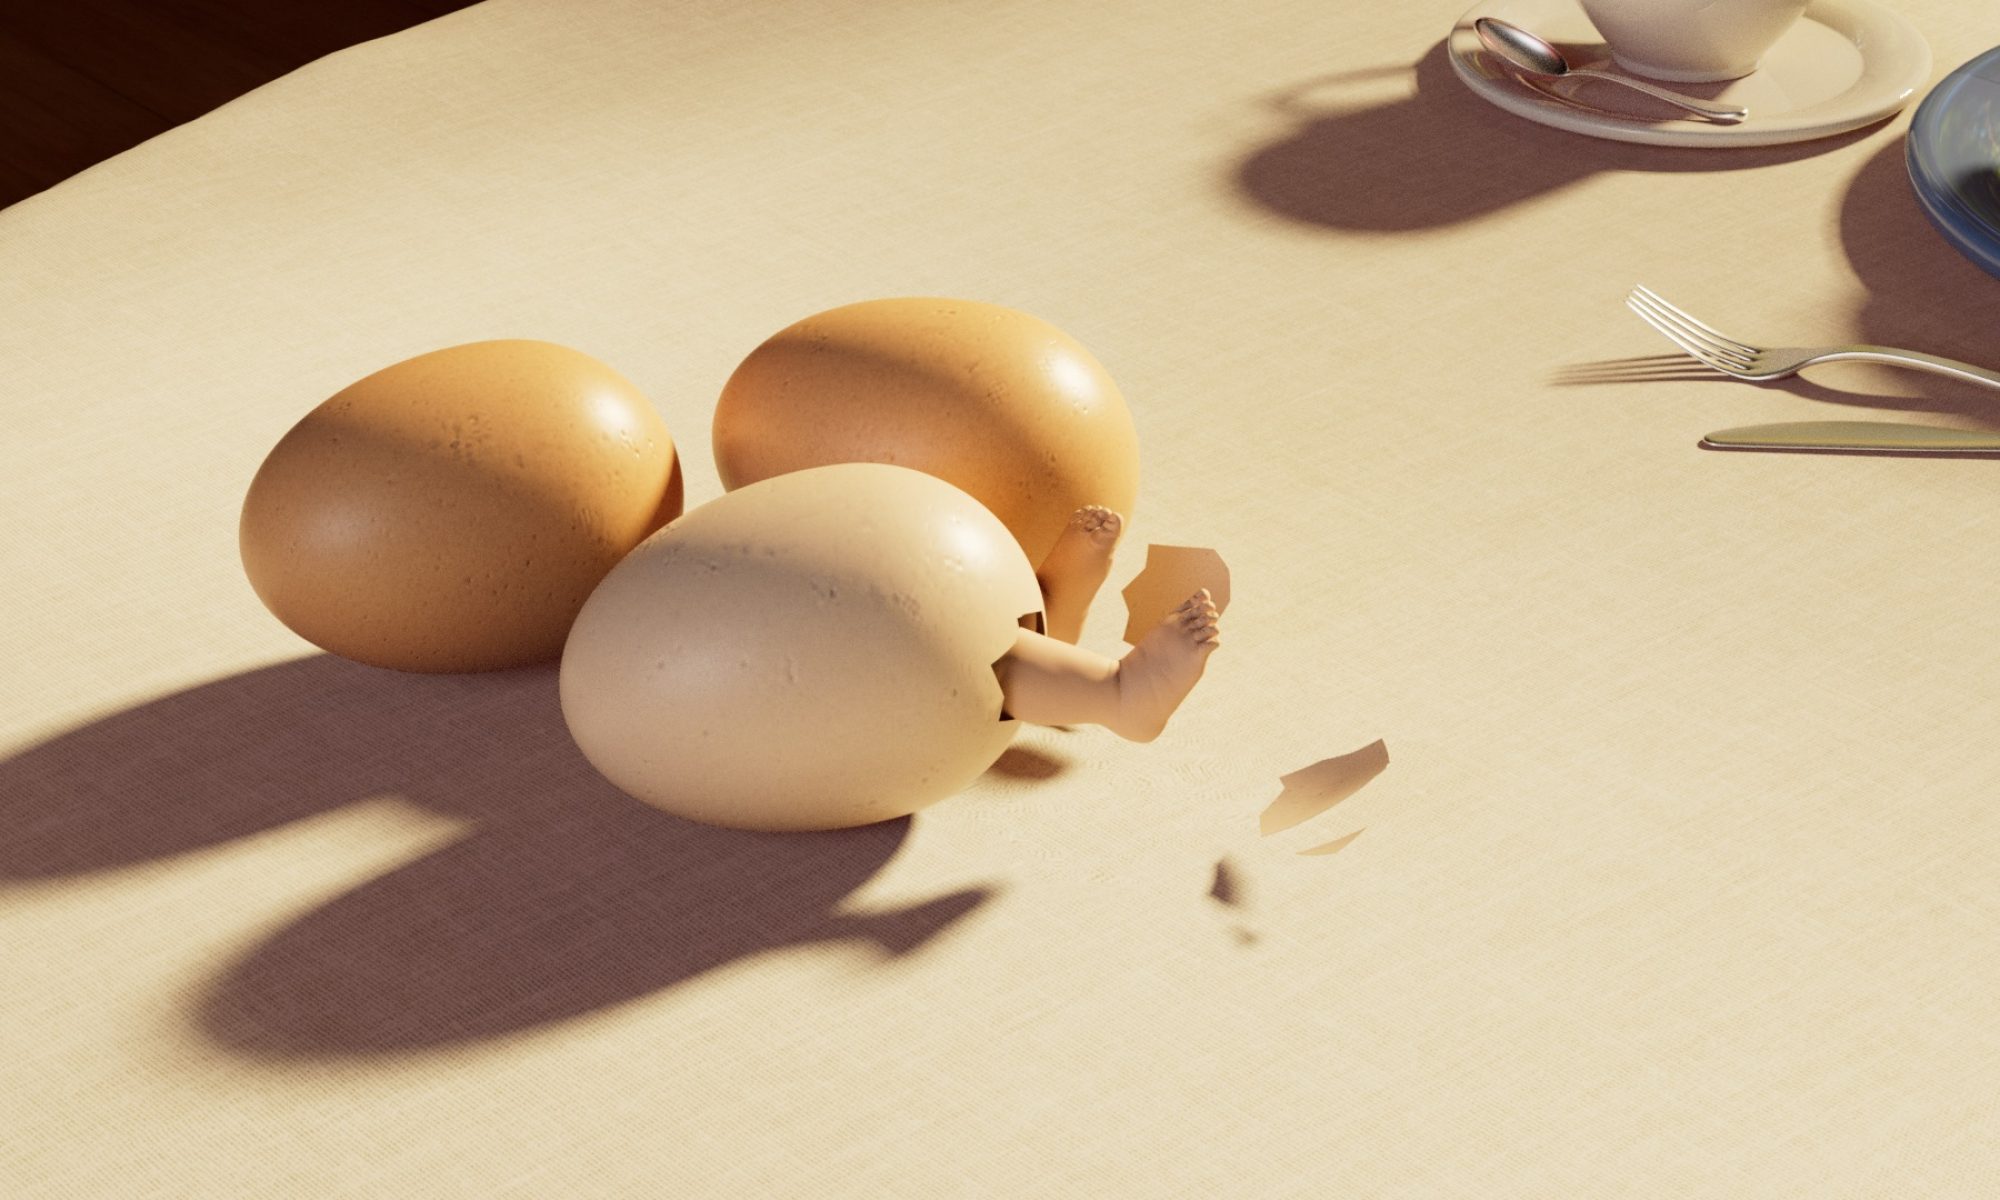
Birth: This story is about a beautiful and cozy time at home, there are a few eggs placed on the table. One of the eggs spins and suddenly two baby legs kick out of the eggs. He holds strength, then he stands up and walks away with his bare and clumsy feet. I want to create a warm ambiance in my animation. The techniques of this animation should be kicking, walking, and some passive collider animation with the tablecloth. I think those are basic but classic animations to start with, so I decided to choose this story as the one to develop further.A cup of coffee: This story is about in the morning, there’s a cup of hot coffee ready for a drink and some desserts for serving as well. There is hot steam comes out from the fresh coffee. After a while, the coffee begins to bubble and more and more bubbles come out from the cup. Suddenly, a shark comes out of the coffee and its fin changes the coffee into the blue water. The hint in this story is about the bubbles coming from the shark in the coffee, but it’s impossible to imagine there is something alive in the normal coffee that we drink every day. The “sea” pattern on the cup also connects with the ending of this narrative. The techniques of this animation should be the liquid, swimming animations, and some VFX effects as well. I think the liquid thing might be challenging to start with and the bleeding of water color changing would be difficult. Camouflage: This narrative is just like its name, “Camouflage”. The plot is about there being some avocados on the table. The camera starts to shoot close up and inside those green textures, an eye opens and blinks. In the end, a chameleon crawls down from this bunch of avocados. The point of this story is the chameleon already hides in those avocados at the beginning, which means what you see is not always what you see and there might be something special inside them.
Storyboards developments:
Before making the animation, I develop the storyboards into different versions. I draw different perspectives to think about the connection between each image and the changes in cameras. I draw those storyboards by following some camera theories, like the rule of thirds.
Rough sketches:
I draw rough sketches about how the egg character is going to shake, kick, stand and walk away. Because his posture is from lying to standing, which means he needs to hold a lot of strength to stand up, like a strong athlete with motor skills. Also, I want to make him a baby character to make the story feels cozy and adorable, the baby walks should be slightly clumsy and slow.
Video references:
In order to test if it’s possible that the egg character can stand from a lying posture and then walk away, I record a video by myself and I try to stand up to see if it’s working. Also, I used this video as a reference for making animation.
Also, I spin the eggs and record them as a reference to see how the egg shakes in real life.
ZBrush model sculpturing:
sculpting processI sculpt the legs in ZBrush for the egg character in my animation. I first follow the foot and leg sculpturing tutorials to sculpt the basic shapes. Then, I added more details for the toe gaps, curves, and some inflating mesh parts. I put the baby images on the side to use as references. After sculpting the foot and leg separately, I combine these two meshes using the dynamesh tool to smooth the whole shape. I think the most challenging part is the feelings of baby legs because they are more fat and round than adult legs, which means a lot of curves should be decreased on the legs. Also, the toe gaps are difficult to separate, but I use the boolean tool to solve this problem. I import the UV map of a leg from Maya to get a more standard UV map for later baking. Projecting the UV map on the leg that I sculpted can make it into a more standard structure. I save the low poly leg for animating and the high poly leg for baking.Then, I import the leg into Substance Painter to bake the mesh maps and assign the basic skin material as well. The UV map I did before also works at this stage because the baking process might have problems if the model’s structure isn’t equally distributed. Next, I export the mode, and textures, and import them into Maya. I make some links in Hypershade to assign those skin textures and make them work. Finally, the legs are shown with skin textures in Maya.final leg
Rigging process:
I make the FK handles and then the IK handles. Because the two legs are symmetrical, so I duplicate the right leg’s joints on the left leg. The IK handles are a bit complex to make, but they can make the knees bend when the feet lift. Also, they can make the feet stand on the ground. After duplicating the joints, I bind the mesh with the rigs. I try to lift the feet to see how it works and the mesh looks squeezed, but I use the weight painting to solve this problem. Also, I use some curves to make the controllers for the legs, egg mesh, and the whole character, which is the main control. The main control should not be animated, but it can change the location of the character. Because it can bring the whole animation to any place, so it should never be animated.final leg rig
Animation:
I make the kicking and walking animation at first. I try to project the curve on the egg to cut the egg crack pieces, but then I realize the multi-cut tool is easier to cut. I extract the egg crack from the whole egg mesh. I make the kicking and walking animation at first. I try to project the curve on the egg to cut the egg crack pieces, but then I realize the multi-cut tool is easier to cut. I extract the egg crack from the whole egg mesh.By using the video references I recorded before, I make the walking and kicking animation. Because the posture changing needs a lot of strength, I make the feet hold for a while and the character stands up slowly to match the physics. The egg crack part is a bit complex to do. Although I extract the crack parts from the egg mesh, they are still connected when the character walks. Therefore, I duplicate a group of egg cracks and use the visibility function to make them look like staying on the ground. I keyframe the positions of the cracks.I follow the same theory of waking animation as I made before. The difference between my animation and the standard walking cycle is the character should walk naturally and not in a uniform motion. Also, he should walk fast at first and then walk slowly because of the anticipation and the strength he gets when standing up. Throughout the whole animation, I reference the character instead of using the original rigs because this can let me change and have the backup of the character.walking animation playblast
Environment:
home scenarioI want to create a home scenario and this story happens on a table in this room. I make some cutlery and furniture.I set three cameras between each shot. I think the challenging part is how to use camera language to connect each shot together. The camera views I use at first are very flat, but then I change them into bold angles, like the close-up of the legs. Also, the shot should switch between the motion change, like the first shot can switch to the second shot when the character kicks out of the egg; the second shot can switch to the third shot when the character begins to stand. Therefore, the audience can feel the motion of the character leading to the camera switching. In the beginning, I set the camera in a pan view to show the whole environment. I set the camera to follow the character at the end and make it shoot slower than the character walks, like behind the walking animation. animation playblast
Cloth Animation
Ncloth Passive Colliders TestI want to add the details for the cloth on the table like there will have slight depth when the character stands and walks on the tablecloth. I test the ncloth firstly and make the character a collider to interact with the cloth. This video is a ncloth test video to see how the cloth is raised by the character. The problem is that ncloth simulation is difficult to run fast and change. Therefore, I use another method to solve this problem.I use the shape editor to control the shape changes of the cloth. As for each target, I use the sculpting tool to make the depth of the foot stepping on the cloth. The target can also be keyframed and it looks like the footsteps in the cloth. The keyframing also works when the foot lifts because normally the cloth should bounce back a bit.
Dub
I make some sound effects by manipulating the objects, like pinching the crisps to imitate the hatching sound. Also, I step on a piece of cloth to make the standing and walking sound. I edit the sound in Premier to reduce the environmental noise and combine the image sequence in After Effects for the final outcome.
Rendering
I add the lighting and several simple materials in the scene before rendering. Because I want to create a warm and cozy ambiance, I change the light to yellow color. I think there are a few things that need to be improved, like the footprints’ depth on the cloth can be deepened and more obvious. Besides, the cloth seems to blend with the character and whole environment, so I’m thinking if I can experiment with different colors and textures to make a better visual effect.render previewI improve the lighting by changing the intensity to 1 and the amount of exposure to make it look more realistic. Also, I rotate the HDR doom light to experiment with different shadows and details in the scenario. For example, there are subtle details about the reflection f the cutlery and porcelains. I make the shadow edges look blurry and more natural.I assign the textures for the models and use Hypershade to make the textures connect together. The Substance plug-in in Maya is convenient for assigning textures. Because there are noises in my scene, I increase the quality settings to decrease them. I try to use denoiser at first, but the final outcome looks shaky and I just increase the quality of rendering, samples of doom light, and other parameters to solve the problem.